Flickr Album
Thanks flickr for hosting my photos and providing me such convenient web services to access them!
I love building this App because it’s my first experience going through the whole process of design and implementation. In the beginning, I have come up with the prototype in Photoshop. Of course, I have applied the popular 960 Grid System. When designing it, I never thought about technical details. I had confidence that I could implement whatever I drew. However, when I really started coding, I hated myself :)
What difficulties did I encounter when I implemented this app? Well, a lot.
AJAX to retrieve data from flickr
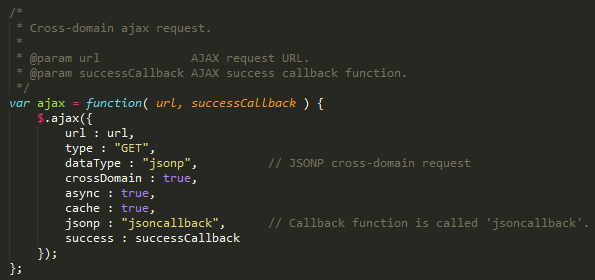
I have chosen the easiest two APIs, one is to retrieve all the public photos of a given user flickr.people.getPublicPhotos, and the other is to retrieve all the available image resources of a specific photo flickr.photos.getSizes. Both of the APIs do not need authentication. Of course, I invoked the two APIs via JSONP. However, it really takes me some time to figure out that the JSONP callback function must be named ‘jsoncallback’. Following is what the finalized AJAX call looks like:

Carousel sliding effect
There are various means to implement the carousel sliding effect. Mine is maybe the simplest one. A div element works like a mask window, which encloses the ul carousel. The mask window is of fixed width and the overflow is hidden. It ensures that only a part of the carousel is displayed. By adjusting the left position of the carousel, we are able to control which part is displayed. In addition, by applying an animation effect, it looks like the carousel slides left and right.
<div class="ui-carousel-container">
    <ul id="carousel" class="ui-carousel">
        <li class="ui-thumbnail">
            <a href="#" class="ui-photo-border">
                <img alt="thumb1" src="resources/icons/thumbnail-holder.png">
            </a>
        </li>
        <li class="ui-thumbnail ui-photo-gap">
            <a href="#" class="ui-photo-border">
                <img alt="thumb2" src="resources/icons/thumbnail-holder.png">
            </a>
        </li>
        <li class="ui-thumbnail ui-photo-gap">
            <a href="#" class="ui-photo-border">
                <img alt="thumb3" src="resources/icons/thumbnail-holder.png">
            </a>
        </li>
    </ul>
</div>
.ui-carousel-container {
    display: inline-block;
    width: 660px;
    height: 180px;
    overflow: hidden;
    padding: 10px;
    margin: 0 20px;
}

.ui-carousel {
    width: 660px;
    height: 180px;
    white-space: nowrap;
    padding: 0;
    margin: 0;
    position: relative;
    left: 0
}
Load Photos
Undoubtedly, the most difficult part is how to load and pre-fetch data. Clearly, I can’t load all the data all at once. Each time, I only load 15 photos. It includes retrieving the photo IDs and using the IDs to retrieve thumbnail image (two cross-domain AJAX calls). What’s more, to improve the user experience, I pre-load two slides of thumbnail images ahead. Two actions may trigger pre-fetch. One is clicking the thumbnail’s slide right button, the other is clicking the large photo’s switching next button. Actually, switching next photo could trigger sliding next thumbnail page, which may trigger pre-fetch photos. You may read Carousel constructor function to learn more.